
Are you experiencing Instagram crashes, slow performance, malfunctions, or storage concerns when using the app? It’s time to declutter and improve your Instagram experience by emptying the cache.
In this blog article, I will walk you through the process of clearing the Instagram cache and explain why it is necessary for the best performance. Whether you’re an ardent Instagrammer or a casual private Instagram user, knowing how to clear the cache will help you handle frequent difficulties and avoid Instagram crashes. It will provide a smooth and flawless browsing experience for Instagram. So, let’s dive in and uncover the benefits of cleaning your Instagram cache.
In this comprehensive guide, I elucidate the systematic procedure for clearing the cache on Instagram across various platforms, including Android, iOS, and web browsers.
How to Clear Instagram Cache on Android Devices
In this section, I’ll guide you through the step-by-step process of cleaning the Instagram cache on your Android smartphone, allowing you to enjoy a more seamless and optimized Instagram experience.
Step 1: Access App Settings
- Tap the Settings app on your Android smartphone. It is often represented by the gear symbol.
- Scroll down to find Apps & Notifications. Tap it to continue.
Step 2: Locate Instagram in the App List
- The Applications & Notifications option displays a list of all applications installed on your device. Scroll down the list to find Instagram.
- Tap Instagram to view the app’s individual settings.
Step 3: Clearing the App Cache
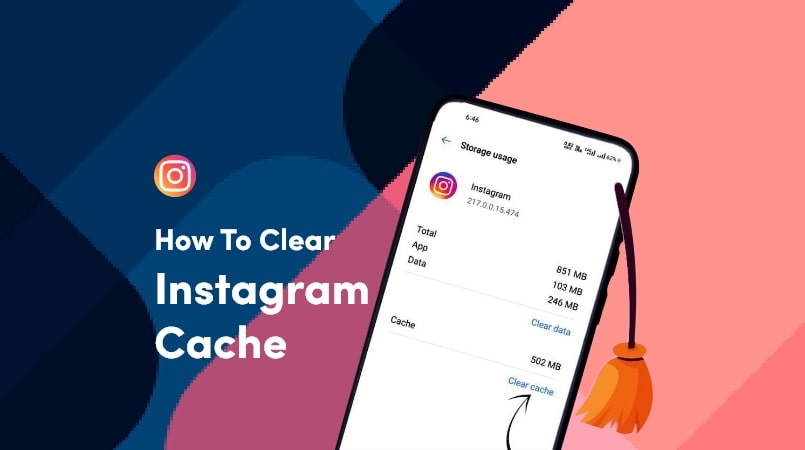
- When you visit the Instagram settings, you’ll discover a variety of choices. Look for “Storage” and touch it.
- On the next page, you will see two options: “Clear Data” and “Clear Cache”. Tap on “Clear Cache”.
Step 4: Confirming Cache Clearing
- A popup will display, requesting that you acknowledge the operation of emptying the cache. Tap OK or Clear to continue.
- Please keep in mind that deleting the cache does not remove your Instagram account’s login credentials, stored data, or personal information.
Step 5: Restart Instagram
- Exit the settings window and return to your home screen.
- When you relaunch the Instagram app, it will start from scratch with no cached data. The cache has been successfully emptied.
Remember that emptying the cache on a regular basis might make the Instagram app on your Android smartphone operate better and save more space. If you have any more problems, try restarting the procedure or contacting Instagram support for help.
How to Clear Instagram Cache on iPhone
If you’re an active Instagram user, you’ve probably noticed that the program may sometimes become slow or even have performance difficulties. In most situations, this is due to the buildup of cache files.
These files include temporary data that the app uses to speed up the loading of photos, videos, and other material. However, with time, the cache might expand in size, thereby affecting app performance. To ensure a seamless Instagram experience, clear the cache on your iOS device.
Step 1: Access the Settings Menu
- Launch the Settings app on your iOS device. It is often represented by the gear symbol.
- Scroll down the Settings menu and look for “General.” Tap it to continue.
Step 2: Navigating to the Storage Settings
There are a variety of choices available under the General settings. Look for “iPhone Storage” or “iPad Storage” and touch it. This will take you to the storage management page for your device.
Step 3: Manage Instagram Storage
- On the storage management tab, you’ll see a list of installed programs organized by the amount of storage they use. Scroll down the list until you see “Instagram.” Tap it to view the app’s storage settings.
- This section displays a breakdown of the app’s storage consumption, including how much space is taken up by the cache. To delete the cache, click the “Offload App” or “Delete App” option. Do not fear, this action will not delete your account or any personal information.
Step 4: Reinstalling Instagram
- After uninstalling or removing the program, go to the program Store and search for “Instagram.”
- Once you’ve found the official Instagram app, press the download or re-install option to reinstall it.
- To finish the installation, just follow the on-screen directions.
- Once the app has been reinstalled, log in to your account and enjoy a new Instagram experience.
Follow these easy steps to clear the cache on your iOS device and guarantee that Instagram functions properly. Regularly emptying the cache may assist in avoiding performance problems and keep the program functioning smoothly.
How to Clear Instagram Cache on the Web Browser
Clearing Instagram’s cache may help improve app performance and alleviate problems like sluggish loading times or bugs. If you use Instagram using a web browser, here’s how to clear the cache in a few easy steps.
Step 1: Open Instagram settings
First, go to the Instagram website using your choice of web browser. Log in to your account if you haven’t already. To view your profile, log in and then click on your profile image in the upper right corner of the page.
Step 2: Access Account Settings
From your profile, click the gear-shaped symbol next to your username and choose “Settings” from the dropdown menu. This will take you to the account settings page, where you may change many features of your Instagram account.
Step 3: Clear the History Data
Scroll down the account settings page until you see the “Privacy and Security” section. Within this area, look for the “Data and History” option. Click it to see the data and history settings. To optimize your Instagram experience on the desktop, delete the history.
Following these easy steps will allow you to clear the cache on Instagram’s online version, perhaps improving your surfing experience. Keep in mind that clearing your cache on a regular basis will guarantee that the app and your web browser run smoothly.

One of the top blogs about technology is foxsinsights.com, which specializes in producing excellent, engaging, and practical information. We are a team of seasoned writers that enjoy keeping up with the newest advancements and trends in the tech industry. Our goal is to impart genuine, practical information to our workers.